Amber Qualm is an Accessibility Consultant working at Level Level. With over ten years of experience in digital product design, she combines her knowledge of user experience and accessibility to help companies, designers and developers create digital products that are accessible for all users.
The WebAIM analysis shows an interesting trend: while accessibility errors have increased overall in 2024, websites that previously invested in accessibility continue to improve. This pattern tells us something powerful – when teams commit to accessibility, it makes a real difference.
If you’re reading this, you’re likely familiar with WCAG 2.2 guidelines and understand the basics of making websites accessible. You’ve checked the contrast ratios, added alt text to images, and made sure your site works with keyboard navigation. These fundamentals are valuable, but you’re ready to take your accessibility practice further.
This article builds on our previous guide, “Smooth UX: A Handy Accessible Design Checklist,” moving beyond individual fixes to show you how accessibility can become a natural part of your UX process. You’ll learn practical techniques to weave accessibility into every stage of design, from initial wireframes to final implementation.
By applying these advanced approaches, you’ll create inclusive websites and experiences that work better for everyone – not just meeting guidelines, but truly serving all your users.
POUR principles at a glance: your accessibility foundation
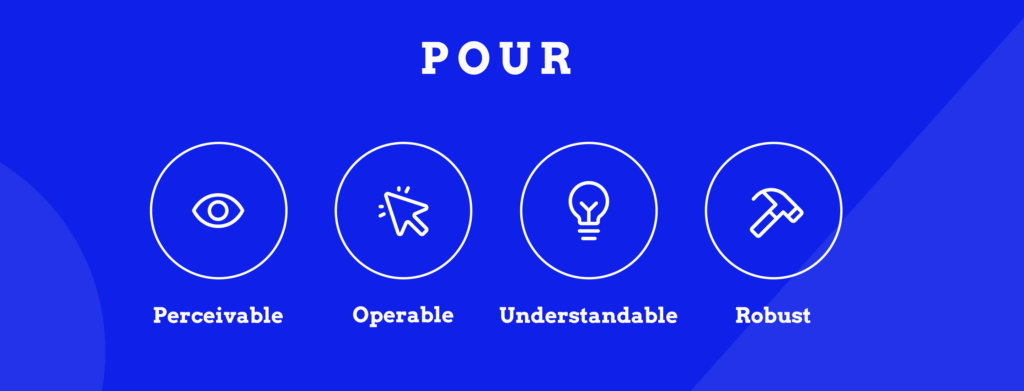
Before we dive into advanced techniques, let’s quickly revisit the foundation of all accessible design. Every accessible experience you create should meet these four principles:
| The POUR Principles | Quick reference guide |
|---|---|
| P – Perceivable | Users can take in the information using at least one of their senses. Example: Images have text descriptions, videos have captions, and important information isn’t conveyed through colour alone. |
| O – Operable | Users can interact with all controls and navigation, regardless of how they access your site. Example: Everything works with a keyboard, touch gestures have alternatives, and users have enough time to complete tasks. |
| U – Understandable | Users can comprehend both the content and how to use the interface. Example: Instructions are clear, errors are explained helpfully, and the site behaves predictably. |
| R – Robust | Your content works reliably across different browsers, devices, and assistive technologies – now and in the future. Example: Your HTML is valid, you use proper semantic markup, and your site doesn’t break when users zoom in or use screen readers. |
Think of it this way: if someone can’t perceive your content, they can’t use it. If they can perceive it but can’t operate it, they’re stuck. If they can operate it but don’t understand it, they’ll leave frustrated. And if it only works on specific devices, you’ve excluded everyone else.
Simple, right?
Now, let’s explore why getting these principles right matters more than ever…
Why accessibility UX design matters
According to WebAIM, 95.9% of popular websites fail basic accessibility standards, and this clearly represents countless missed opportunities to connect with users who rely on accessible design to navigate the web.
However, besides meeting standards, making websites accessible also sparks innovation that benefits everyone. Think about curb cuts, those sloped areas between roads and pavements. While designed for wheelchair users, they help people with pushchairs, delivery workers with trolleys, and travellers with wheeled luggage. The same principle applies to accessible UX design: solutions created for specific needs often make experiences better for all users.
This becomes even more significant when we look at the reach: 16% of people globally experience significant disabilities. But accessibility benefits extend far beyond this group to include users like:
- People using mobile devices in bright sunlight who need high contrast.
- Users with temporary injuries who rely on keyboard navigation.
- Anyone trying to watch videos in noisy environments who needs captions.
You might be wondering: isn’t this the same as usability? Well, no, and you will see why.
Accessibility vs usability
While accessibility and usability are related, they serve different purposes in UX design. Accessibility ensures everyone can use your website, including people with disabilities, while usability focuses on making the experience smooth and efficient for all users.
Think of it like a building entrance: accessibility means having both stairs and a ramp so everyone can enter, while usability means ensuring the door isn’t too heavy and opens in an intuitive direction. In web design, good accessibility might mean ensuring your forms work with screen readers, while good usability means making those forms clear and easy to complete.
When you combine both, you create better experiences for everyone.
Elevating your accessibility approach: 6 UX techniques
Moving beyond basic accessibility, these advanced techniques help weave inclusive design throughout your UX process. Rather than treating accessibility as a checkbox exercise, these approaches create naturally accessible experiences from the ground up.
1. Design system integration
A thoughtfully crafted design system serves as your foundation for consistent, accessible experiences. Rather than retrofitting accessibility features, build them into your component library from the start.
Begin with component documentation that includes specific accessibility requirements. For each component, specify keyboard navigation patterns, required ARIA attributes and roles, focus management rules, and screen reader behaviour expectations. This helps developers implement components correctly every time.
Create accessibility-focused design tokens that standardise:
- Colour combinations that meet contrast requirements.
- Typography scales that maintain readability.
- Spacing patterns that ensure tap targets are large enough.
- Focus indicators that are clearly visible.
Build automated testing into your workflow to catch issues early:
- Set up accessibility checks in your build pipeline.
- Test components with screen readers.
- Verify keyboard navigation patterns.
- Monitor colour contrast compliance.
Document how components should be combined to maintain accessibility. For example, explain how nesting interactive elements might affect keyboard navigation or screen reader announcements. Regular testing with actual assistive technologies helps ensure your components work as intended.
2. Mapping inclusive user journeys
To create truly inclusive experiences, user journey mapping needs to consider diverse abilities and interaction methods. Instead of designing for a single “typical” user, map out how different people might navigate your interface.
Start by incorporating diverse participants in your research. Include people who:
- Use screen readers and other assistive technologies.
- Navigate exclusively by keyboard.
- Have different levels of tech familiarity.
- Experience colour blindness or low vision.
- Need more time to process information.
- Use magnification tools.
Once you have your group, you can begin testing and documenting each stage of the journey. This includes potential accessibility barriers, alternative interaction paths, required assistive technology support, areas where users might need extra guidance, and points where cognitive load might be high.
The W3C’s “Stories of Web Users” provides real-world examples of how people with different abilities interact with websites. Use these insights to inform your journey mapping and identify potential obstacles early in the design process.
Finally, don’t forget to test your journeys with real users and assistive technologies. This helps uncover issues that automated testing might miss and ensures your flows work for everyone.
3. Balancing aesthetic design with accessibility needs
You don’t need to choose between beautiful design and accessibility. The trick is to use aesthetics to enhance usability rather than hinder it. Here’s how to strike that balance:
Start with a progressive enhancement approach. Build a solid, accessible foundation first, then add visual flourishes that don’t interfere with functionality. For example, begin with properly structured content and semantic HTML before animations or decorative elements.
Then, when working with your brand’s visual identity, try to find creative ways to meet contrast requirements while maintaining brand colours. It’s also essential to use patterns or textures instead of just colour to differentiate elements, such as buttons, links, and form errors.
Include fallback options that maintain visual appeal:
- Provide still images alongside animations.
- Ensure text remains readable when users adjust its size.
- Design hover states that work equally well with touch or keyboard focus.
- Create mobile layouts that adapt gracefully to zooming.
Andrée Lange – Digital Designer at Level Level & Trainer at The A11Y Collective“Good accessible design often leads to better aesthetics overall. Simple, clear layouts with proper spacing and hierarchy tend to look more polished than cluttered, complex designs.”
4. Implementing accessibility testing methods
Building effective accessibility testing into your workflow helps catch issues early and ensures consistent quality. Here’s how to set up a practical testing system:
- Create a multi-layered testing approach that combines automated checks with tools and manual testing with assistive technologies. The manual part should also include regular reviews by users with different abilities and monitor the website’s performance across devices (more on that later).
- Adjust your automated testing to include HTML validity and semantic structure, ARIA implementation, colour contrast ratios, keyboard navigation flow, and image alt text presence.
- Build a manual testing routine where team members navigate using only keyboards and test with popular screen readers. Other forms of testing include verifying form completion and error states, checking content scaling and reflow, and testing with different browser zoom levels – users should be able to increase text size up to 200% without losing content or functionality.
- Partner with people who use assistive technologies regularly for real-world testing. Their feedback often uncovers issues automated tools miss, like unclear instructions or confusing navigation patterns. You could also book an accessibility audit service so that professionals can monitor ongoing compliance.
- Document your testing process clearly so team members can replicate it. Include checklists, testing scripts, and guides for using different tools. Keep records of test results to track improvements and identify common issues over time.
5. Building device-agnostic accessible experiences
Creating accessible websites means ensuring they work well across all devices and platforms. This goes beyond basic responsive design to consider how different devices affect accessibility features.
Start with a mobile-first approach that prioritises performance:
- Load essential content first.
- Minimise JavaScript that might slow screen readers.
- Ensure touch targets are large enough for all users.
- Test with different network conditions.
- Validate that zoom functions work properly.
Consider how different devices handle assistive technologies:
- Test VoiceOver on iOS.
- Verify TalkBack on Android.
- Check desktop screen readers.
- Validate keyboard navigation.
- Monitor focus management across devices.
Pay special attention to input methods:
- Make sure touch gestures have keyboard equivalents.
- Provide alternatives to hover states.
- Test with various input devices like switches.
- Ensure voice control works effectively.
- Support both touch and stylus input.
Design your interface to adapt gracefully:
- Maintain readable text at different zoom levels.
- Ensure controls stay usable when magnified.
- Test that layouts reflow properly.
- Verify that captions and transcripts work across devices.
- Check that forms remain functional at any size.
6. ARIA implementation and dynamic content
Understanding ARIA (Accessible Rich Internet Applications) roles and properties helps you create complex interfaces that remain accessible. Here’s how to implement ARIA effectively in dynamic content:
Focus on proper focus management in single-page applications:
- Restore focus after page transitions.
- Update screen reader announcements when content changes.
- Handle modals and overlays correctly.
- Maintain a logical tab order.
- Keep users oriented during updates.
Use ARIA live regions strategically:
- Announce important updates without disrupting users.
- Set appropriate politeness levels for different types of messages.
- Group related updates to avoid overwhelming users.
- Time announcements thoughtfully.
- Provide ways to review past announcements.
When building custom widgets:
- Start with native HTML elements when possible.
- Add ARIA roles only when needed.
- Maintain relationships between elements.
- Test with multiple screen readers.
- Document expected behaviour.
Watch out for common pitfalls:
- Avoid redundant ARIA labels.
- Don’t override native semantics.
- Test dynamic content thoroughly.
- Keep ARIA attributes up-to-date.
- Validate ARIA implementation.
Enhance your accessible UX design expertise with The A11Y Collective
Creating truly accessible websites requires moving beyond basic principles. The techniques we’ve covered – from integrating accessibility into design systems to optimising performance across devices – provide a solid foundation for building inclusive experiences.
These methods help ensure your designs work for everyone while maintaining high standards of design excellence. However, like any expertise, accessible UX design is a continuous learning process. Tools and techniques evolve, and there’s always more to learn about serving users with different needs.
Looking to deepen your accessibility knowledge? The A11Y Collective offers hands-on courses that teach you how to implement these advanced techniques effectively. You’ll learn to:
- Build accessibility into your design process from the start.
- Create interfaces that work with various assistive technologies.
- Test effectively using real-world scenarios.
- Balance visual design with accessibility requirements.

Ready to take your accessible design skills further?
Enrol in Accessible design, the basics today, and learn how to create genuinely inclusive web experiences.