Caitlin de Rooij is a Web Accessibility Specialist. She works as an Accessibility Consultant for Level Level and provides training and workshops for enhancing digital accessibility. Caitlin’s expertise lies in ensuring that websites and digital content are designed and developed to be inclusive and usable for individuals with diverse abilities and disabilities.
Looking to make your website more accessible? While you might already know the basics of web accessibility, finding and fixing every potential barrier can feel like searching for a needle in a haystack. That’s where systematic testing comes in.
In this guide, we’ll show you six practical steps to test your website’s accessibility – from quick automated scans to in-depth testing with users. You’ll learn how different testing methods work together to create a complete picture of your site’s accessibility.
We’ll walk you through using automated evaluation tools, performing manual checks, testing with assistive technologies, and gathering feedback from users who rely on these tools daily.
So, no matter if you’re a:
- Developer
- Designer
- Content creator
- Project manager
- eCommerce store owner
- Or just someone with a website
You’ll find clear, actionable steps to make your testing more thorough and effective.
Let’s get started.
6 essential web accessibility testing steps
Testing web accessibility might initially feel overwhelming, but just like every complex project, breaking it down into manageable steps makes everything straightforward. Think of it as a puzzle – each piece helps you get a more complete picture of how people with different needs experience your website.
Let’s explore each step in detail, starting with the foundation: understanding web accessibility standards.
1. Understand the web accessibility standards
Before diving into testing tools and techniques, you’ll need a solid grasp of what makes a website accessible. This means understanding the Web Content Accessibility Guidelines (WCAG) 2.2 – the blueprint for creating websites that work for everyone.
Each WCAG guideline has specific success criteria that tell you exactly what to test for. For example, you’ll need to check if the text meets contrast requirements (SC 1.4.3: Contrast (Minimum)(Level AA)), if videos have captions (SC 1.2.2), and if forms include clear labels (SC 3.3.2: Labels or Instructions (Level A)).
Not sure where to start? The A11Y Collective’s free course “Web Accessibility, the business case” gives you a practical introduction to these key regulations. Once you’re ready to dive deeper, our “Web accessibility, the basics” course (€50 excl. VAT) shows you how to apply these guidelines in real-world situations.
Taeke Reijenga – Founder & CEO at Level Level“Good accessibility testing starts with knowing what you’re looking for. Take time to learn these standards – they’ll help you spot issues more effectively and make informed decisions about what needs fixing first.”
2. Utilise top automated tools for quick insights
When testing web accessibility, automated tools give you a quick way to spot common issues. While they can’t catch everything, they’re a brilliant first step that helps you find obvious problems fast.
Let’s explore some handy automated testing tools and how to use them effectively:
Axe DevTools is a popular browser extension that scans your pages directly in Chrome, Firefox, or Edge.
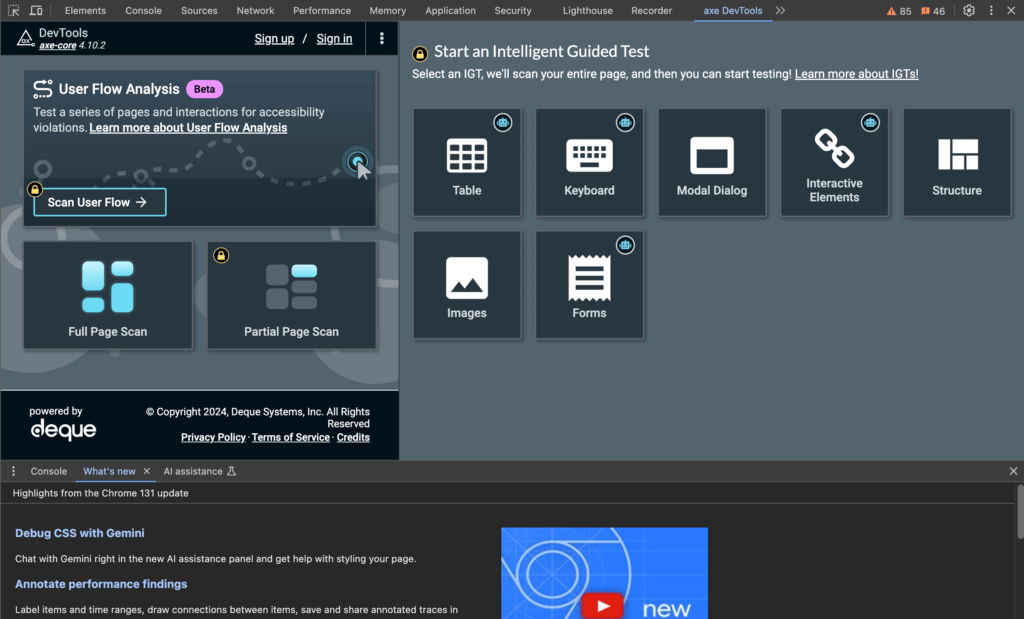
After installing it, simply:
- Open your browser’s developer tools by right-clicking anywhere on the page and selecting Inspect.
- Navigate to the “axe DevTools” tab.
- Log into your account.
- Hit Full Page Scan or Partial Page Scan to start the process.
- Once it’s complete, click on Overview to see the detailed report showing issues and how to fix them.
Chrome’s built-in Lighthouse tool offers another great option.
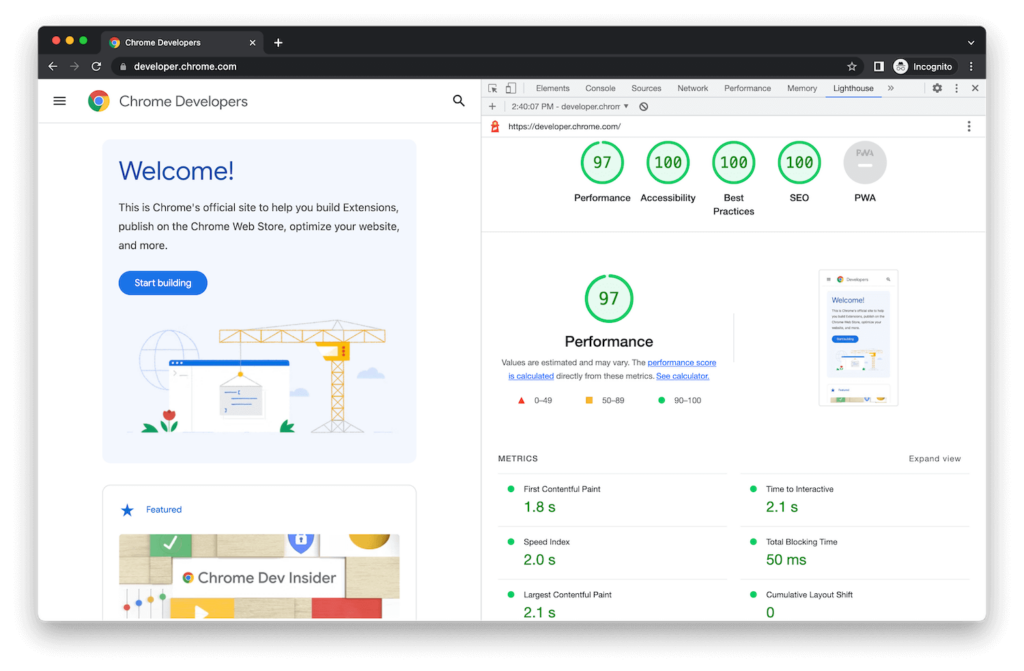
To use it:
- Open Developer Tools.
- Click the Lighthouse tab.
- Select Accessibility under Categories.
- Click Analyze page load.
- Check your accessibility score and suggestions.
The WAVE extension provides visual feedback right on your webpage.
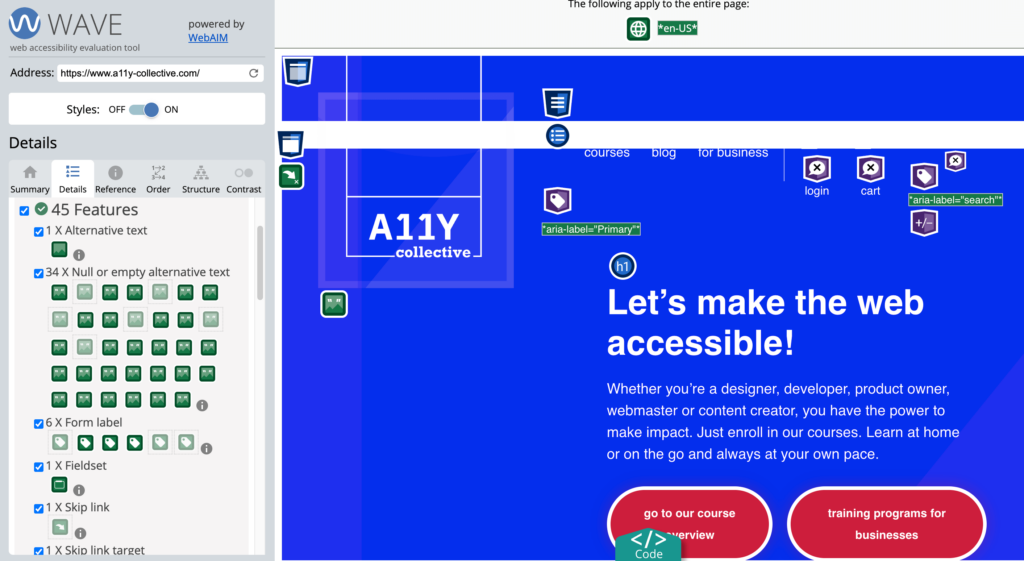
Unlike the other tools, you don’t need to install anything. Just put the URL of the page you want to test on, and you’ll get your analysis!
⚙️Want to see more tools? Check out the Web Accessibility Evaluation Tools List.
Now, while these are all helpful, remember they typically catch only about 30–40% of accessibility issues. For example, they’re excellent at finding:
- Missing alternative text for images.
- Poor colour contrast – we recommend using the WebAim Contrast checker as it directly verifies this against the WCAG 2.2 contrast requirements.
- Empty or broken links and buttons – these tools scan for broken links and ensure proper error handling when links fail.
- Missing form labels.
- Incorrect heading structure.
However, many accessibility issues need human judgment. For instance, automated tools can tell you whether an image has alternative text, but they can’t determine if that text meaningfully describes the image. That’s why combining automated testing with manual checks gives you the most complete picture.
3. Perform manual testing for thorough evaluation
Manual testing is where you really discover how your website works for people who rely on keyboards, screen readers, and other assistive technologies. While it takes longer than automated testing, it reveals issues that machines simply can’t detect.
Start by testing keyboard navigation throughout your site.
- Press the Tab key to move through page elements and watch for a visible focus indicator – you should always be able to tell where you are on the page.
- Try reaching every menu, button, form, and interactive element using only your keyboard.
- Pay special attention to complex components like dropdowns and modal windows to make sure you don’t get trapped.
Headings and page structure need careful review to ensure they create a logical outline of your content. Your main heading should use h1, with subheadings following a clear hierarchy that doesn’t skip levels. Well-structured headings help screen reader users navigate your content efficiently and understand how information is organised.
Then, move on to forms. Try completing them using only your keyboard, paying attention to how clearly fields are labelled and whether error messages make sense. Required fields should be obvious before submission, and error messages need to stay visible while users fix their mistakes.
After testing form controls, verify that ARIA is being used appropriately. While automated tools can spot missing ARIA attributes, only human testers can confirm whether ARIA roles and properties actually match component behaviours.
When reviewing links, read each one in isolation – would you know where it leads without the surrounding context? Avoid vague text like “click here” or “read more.” Instead, make sure each link clearly indicates its destination.
For multimedia content, check these essential elements:
- Accurate, synchronised captions for videos.
- Audio descriptions of important visual information.
- Keyboard-accessible media player controls.
- Ability to pause any auto-playing content.
Finally, zoom your page to 200% and verify that all content remains readable and usable. Text shouldn’t overlap, nothing important should get cut off, and the layout should adjust sensibly to the larger size. This test helps you understand how your site works for people who need larger text to read comfortably.
4. Test with assistive technologies
Testing your website with assistive technologies gives you a true picture of how people with disabilities experience your content. It’s one thing to run automated checks – it’s quite another to navigate your site using a screen reader or voice control.
NVDA (for Windows devices) and VoiceOver (built into Apple devices like Macs and Macbooks) are popular free screen readers you can use to test your site. Start by listening to how they announce your content. Pay attention to whether headings, links, and form controls make sense when read aloud. Screen readers should smoothly navigate through your content without getting stuck or missing important information.
Many people who can’t use a mouse or a keyboard rely on voice recognition software to navigate online. You can use one of them, like Dragon NaturallySpeaking, to test how well your website works with these technologies. Try common tasks like clicking links, filling out forms, and navigating between pages using only voice commands. Every interactive element should be reachable and usable.
Remember to test with alternative input devices, too. Some people use switch controls or eye-tracking devices like Tobii Eye Tracker to navigate websites. While you might not have access to all these tools, you can simulate basic switch control navigation using keyboard-only access – if it works well with a keyboard, it’s more likely to work with other input methods.
If possible, also test with non-standard pointing devices such as alternative mice and trackballs like the BIGtrack, as well as specialised keyboard layouts and custom key settings. Examples of these include the Windows On-Screen Keyboard or iOS VoiceOver keyboard.
In the end, the goal isn’t to become an expert with every assistive technology but to understand how different users might interact with your site. This hands-on experience often reveals accessibility issues that other testing methods miss.
5. Book professional audits: Your accessibility safety net
While internal testing is valuable, bringing in professional auditors gives you an expert perspective on your website’s accessibility. These specialists have deep knowledge of WCAG guidelines and years of experience testing with various assistive technologies.
Professional auditors can spot subtle issues that even careful internal testing might miss. They test your site systematically, documenting every potential barrier and providing clear recommendations for fixes. The A11Y Collective’s audit service delivers detailed reports that help your team understand what to fix and why each fix matters.
Planning for an audit involves several steps:
- Defining which parts of your site need testing.
- Gathering documentation about your site’s structure and features.
- Setting aside time for technical review sessions.
- Building in time for fixes and retesting.
- Creating a clear process for documenting compliance.
Think of a professional audit as your safety net – catching any accessibility issues before they affect your users.
6. Test with real users
Nothing beats watching real people use your website. User testing with people who have disabilities provides insights you simply can’t get any other way, revealing how people actually navigate, understand, and interact with your content.
When running accessibility user testing sessions, recruit participants who use different assistive technologies. For example, include people who rely on screen readers, those who use keyboard navigation, and people who need screen magnification. Each group will interact with your site differently and uncover unique challenges.
Set up your testing sessions carefully. Give participants realistic tasks rather than vague instructions. For instance, ask them to make a purchase or find specific information. Watch how they approach these tasks and note where they struggle.
To find testers, connect with disability organisations or post opportunities on specialist job boards like Circa, Ability Jobs, Disability Jobsite, Vercida, and Disability.gov. Always compensate participants fairly for their time and expertise.
Best practices: Integrate accessibility testing into development workflows
Making accessibility testing part of your regular development process helps catch issues early when they’re easier and cheaper to fix. Instead of treating accessibility as a final check, build it into every stage of your website updates.
- Start by setting clear standards for your team. No feature or update should be considered complete without passing basic accessibility checks. This means developers run automated tests locally, manually verify their work against WCAG guidelines, and test with a screen reader before submitting code for review.
- Add automated accessibility testing to your deployment pipeline. Tools like axe-core can run whenever code is pushed, flagging potential issues before they reach your live site. Set up these tests to block deployment if they fail, just as you would with other critical errors. This ensures accessibility stays a priority and prevents issues from slipping through.
- Create simple checklists for everyone involved in updating your site. Content editors should verify alt text for images and check heading structures before publishing. Designers should confirm colour contrast meets WCAG standards before finalising mockups. Make these checks as routine as spell-checking.
- Schedule regular “accessibility sweeps” where your team thoroughly tests the entire site. Pay special attention to common user journeys, testing them with assistive technologies. Consider bringing in professional auditors annually to catch anything you might have missed.
- Keep your team’s knowledge current through regular accessibility training sessions, documentation of common issues and solutions, team discussions about accessibility findings, and updates on new WCAG guidelines and best practices.
Remember that accessibility isn’t a one-time fix – it needs ongoing attention as your site evolves. By making it part of your regular workflow, you’ll create a better experience for all users.
Take your accessibility testing to the next level with The A11Y Collective
Testing web accessibility takes skill and practice, but you don’t have to figure everything out alone. The A11Y Collective’s courses help you build confidence in identifying and fixing accessibility issues.
Ready to deepen your testing expertise? Our “ARIA Explained” and “Advanced Accessible Components” courses show you how to test complex interface elements that often trip up automated tools. You’ll learn to spot subtle issues that can create barriers for users of assistive technologies.
If you need help ensuring your site meets legal requirements and accessibility standards, consider our professional audit service. Our experts provide detailed reports and practical recommendations to improve your site’s accessibility.
Need help with your website’s accessibility?
Our professional audit service will help ensure your site meets legal requirements and accessibility standards. Book now in three easy steps.